Kubernetes Volume Provisioning
Kubernetes Persistent Volume
Statie Provisioning vs Dynamic Provisioning
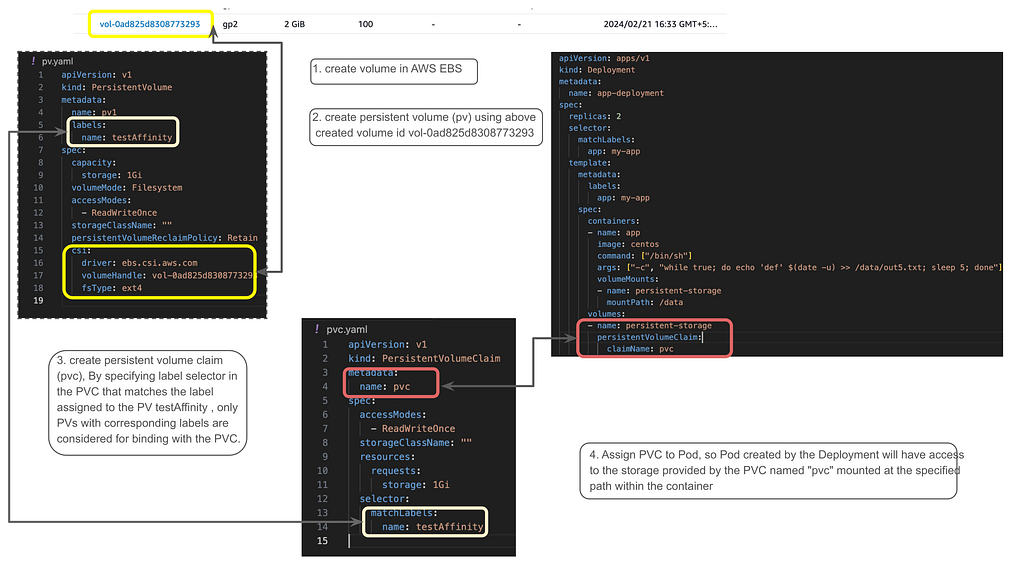
Static Provisioning
Volume LifeCycle
- Volume is initially created, and a PersistentVolume (PV) binds with a PersistentVolumeClaim (PVC).
- When a Pod is deployed, the node is attached to the volume, allowing the Pod to access it.
- When all Pods on a node are terminated or killed, the node gets detached from the volume.
- Despite node detachment, the volume remains persistent.
- When new Pods are created, either on the same node or another node, the volume is reattached to the node.
Static provisioning is crucial when you want to retain past data and attach existing volumes to a new PVC. This is common during migrations or disaster recovery.
claimRef Trick for Reusing PVs
When you attach an existing volume to a new PVC (like in AWS EKS), the PV goes through specific state changes:
Available: The initial state of the PV.
Bound: Once the PVC claims it.
Released: When the PVC is deleted.
The Catch: Once a PV is in the Released state, you cannot just bind a new PVC to it. You must manually edit the PV and remove the claimRef block. This resets the status back to Available, allowing a new PVC to bind to it seamlessly while preserving all existing data!
Dynamic Provisioning

Volume Lifecyle
- StorageClass is created.
- Only StorageClass is created, no other resources are created initially.
- PVC is created.
- PVC triggers dynamic provisioning of a PersistentVolume (PV) based on the StorageClass.
- PV and EBS volume, EBS are created without any node attached.
- Node attaches to the volume when pods are created.
- When all pods are killed in the node, the node gets detached from the volume.
- When new pods created node gets reattached using same volume
Dynamic provisioning is the default for most modern clusters, automatically creating storage resources as developers request them. Here are the rules for managing dynamically provisioned volumes:
- PVC Deletion isn’t Instant: You cannot delete a PVC directly if it’s currently in use. All associated Pods must be terminated first.
- Reclaim Policies:
Retain: When the PVC is deleted, the PV and the underlying cloud volume (e.g., EBS) persist. They must be cleaned up manually.
Delete: Deleting the PVC automatically triggers the deletion of both the associated PV and the underlying cloud volume. - Creating a New PVC: This automatically triggers the provisioning of a brand new PV and Volume based on your StorageClass parameters.
- The Limitation: In dynamic provisioning, you cannot simply attach an existing, pre-populated cloud volume to the cluster. For that, you need Static Provisioning.
Resize PVC storage capacity: only dynamically provisioned pvc can be resized and the storageclass that provisions the pvc must support resize. Regarding the resize of PVC which is associated with PV, you will need to delete the PVC then resize It and create It again.
- manually modify the volume storage
- kill all the pods that are consuming PVC
- delete PVC
- update the PV capacity
- create new PVC and bound with the existing PV
- deploy the pods again
Increasing PVC Storage via Helm (Without Deleting the PVC)
Resizing storage for a StatefulSet deployed via Helm can be tricky. You cannot simply change the size in the Helm values.yaml and run an upgrade, as StatefulSet volume claim templates are immutable.
Here is the workaround used to expand storage
Step 1: Allow Volume Expansion
Ensure your StorageClass allows expansion:
kubectl edit storageClass <sc-name>
Make sure allowVolumeExpansion: true is present.
Step 2: Orphan the StatefulSet
Delete the StatefulSet, but leave the pods and PVCs running by using the --cascade=orphan flag. This prevents downtime while we make changes:
kubectl delete sts --cascade=orphan <sts-name> -n <namespace>
Step 3: Manually Patch the PVCs
Edit the storage capacity of each PVC directly in the cluster to your new desired limit (e.g., 50Gi):
kubectl edit pvc <pvc-name> -n <namespace>
Step 4: Update Helm and Upgrade
Now, change the requested storage size in your Helm chart’s values.yaml to match the exact value you just set in Step 3 (e.g., 50Gi). Be cautious —the values must match exactly.
Finally, run the Helm upgrade:
helm upgrade <release-name> <chart-path> -n <namespace> --recreate-pods --reuse-values
This forces Helm to adopt the existing resources, recreating the StatefulSet with the new storage template and safely bouncing the pods to recognize the expanded volumes!
Reference:
https://kubernetes.io/docs/concepts/storage/persistent-volumes/
https://github.com/keerthanap0810/eks-ebs
Comments (0)
No comments yet. Be the first.